
Checking Saddle Fit
Saddle fitting can be a nightmare. Placing the saddle on the horses back covers the very surface of what you need to see. The following is what I recommend you do when you receive one of our saddles. These steps are provided so that you can determine if your Crest Ridge Saddle is properly fitted to your horse; since I cannot be there in person to check the fit of your saddle. So it becomes your responsibility as the customer and horse owner, to act as my eyes and hands during this procedure. Remember, you have the final say in this matter; you must determine whether or not your new Crest Ridge Saddle is a 'fit', or not, for your horse.”
You can easily check the fit of your gaited horse or mule saddle
Testing saddle fit with a white towel
To start your fitting check, and to be assured that we are going to get an accurate test, do not groom the horse before you ride. Simply brush off any excess dirt and mud to protect the saddle, but leave the deep down dirt on the animal to assure a nice imprint on the white towel after you finish.
When you first took your measurement of the horse according to this page: You were asked to place a wire above the horse’s back edge of his scapula to determine proper gullet and shoulder width. Now that you have your saddle, place a white towel on the horse and a thin Navaho blanket (unless instructed otherwise by your original fitter) on the horse’s back. Mark the front edge of the towel or blanket so you can easily tell the front and back of the towel by the marks that will be on the towel when you are finished.
For a saddle to fit, it must be in the correct position on the horse
For all leather saddles:
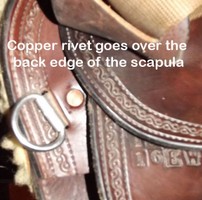
Locate the copper rivet that holds the breast collar ring on the tree (it is behind the breast collar Dee about 2 inches) then place the copper rivet directly over the back edge of the scapula where you took your original measurement. This will be the proper placement of your new flare tree.
For Lite and Ultra Lite saddles: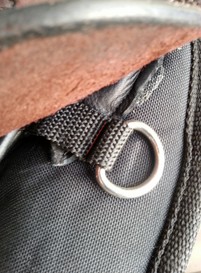
Locate the line of stitching behind the breast collar ring then place the line of stitching directly over the back edge of the scapula where you took your original measurement. This will be the proper placement of your new flare tree.
Record the Results of the White Towel Test
To maximize the value of your white towel test, send us six photographs of your horse:
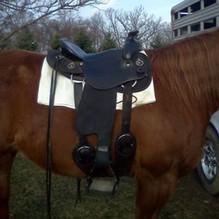
1. BEFORE your test ride, the white towel under saddle, with the photograph showing the front of the saddle from the same angles as the good and poor fit photographs above. We use this photo to check for proper positioning of the saddle.
2. AFTER your test ride, still under saddle with the white towel underneath, with the photograph showing the rear of the saddle on both sides. We use this photograph to check for saddle movement during your ride.
3. AFTER your test ride, with the saddle carefully removed so as not to disturb the blanket and towel, but the blanket and towel still in place on the horse. This is a second check on saddle movement and bar contact areas.
4. AFTER your test ride, carefully remove the blanket and towel so as not to disturb the horse's hair underneath the towel, a picture of the dirt pattern on the white towel. We use this picture to check for bar contact area, pressure points and saddle movement..
5 and 6. AFTER your test ride, your horse's bare back from both sides, with enough resolution so we can see ruffled hairs, dry spots, etc. These pictures need to be taken within a few minutes of removing the saddle, blanket and towel or the impression on the skin will be lost.
PLEASE INCLUDE YOUR FULL CONTACT INFORMATION (name, address, telephone number and e-mail) WITH THESE PICTURES. This allows use to serve you much more efficiently.
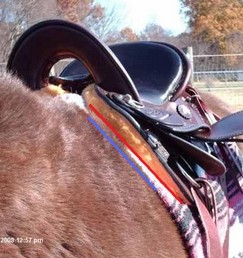
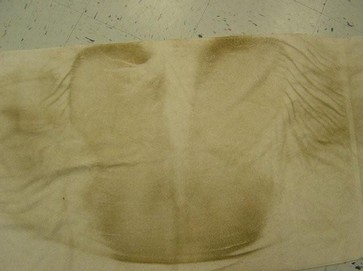 This is what an almost perfect white towel should look like. I wish that this had more of a white stripe down the back of the tree, but this is almost as perfect as they come. The front of the tree is on the top.
Remember, no two riders balance the horse/mule the same way. I can ride my mule and get a great test. Then my daughter can jump on with the same saddle with the same pad on the same animal and get an almost completely different imprint.
The white towel test reflects results from a single combination of horse, saddle, pad, rigging and rider.
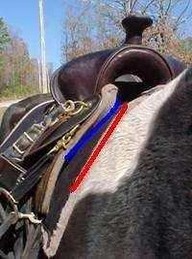
Checking bar angle for saddle fit
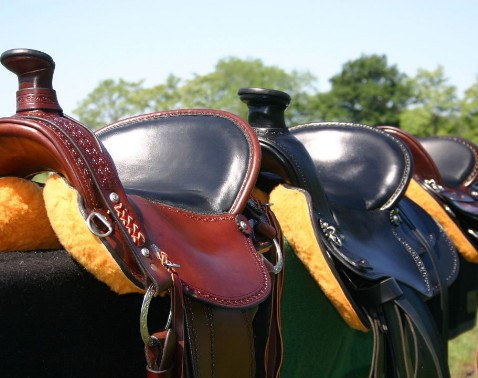
The next step is to fully girth the saddle as you would when you prepare to ride. With the saddle cinched up we now look at the bar angles to match the angle of the horse’s shoulder as illustrated below. The saddle on the left fits correctly. Notice how a line drawn along the body of the horse parallels the line of the saddle. The saddle on the right does not fit correctly. Notice how the lines of the horses body and the saddle are angled.
Next slip 4 fingers of your right hand up to your knuckles in under the saddle between the very top ring of the near side of the saddle. Now with a sliding back and forth motion continue the downward back and forth motion until you reach the breast collar ring. This area should feel snug with even pressure, and is the first indication of a good fit. You do not want to be able to get your whole hand in there easily; because this would indicate a “sloppy” fit. This would also mean that there is no support to prevent all of your weight from being transferred to the top of the tree, resulting in painful pressure points for your horse.
Checking fit at the front: place your 4 fingers back in a central location between the top ring and the breast collar ring and ask the horse to take a few steps toward you while your 4 fingers are still in place. Again you should feel snugness but no pinching. If you feel pinching make sure that you have the front edge of that tree in the saddle up and over where you initially measured the horse.
Repeat the instructions above on the off side of the horse.
Checking for adequate clearance over the withers
Next, check the clearance under the swell. There should be at least
1-inch clearance on a Western Saddle between the bottom of the swell and the horse’s wither and no more than 2 inches unless your horse is mutton withered. A mutton-withered horse naturally is going to have more clearance because there is no wither where there is supposed to be. So, as long as everything else is correct the fit should be OK. I would also like to add at this point that on a mutton withered horse your saddle is going to fit more snugly than it would on a horse with more developed or pronounced withers because instead of the bar having 8 inches of surface to rest on, the lack of wither can reduce this surface up to as little as 5 inches. So naturally with less surface area to divide the weight there will be a bit more pressure, but the most important point is that the saddle needs to be level. With these types of horses girth them up with the appropriate rigging, and then check all that has been mentioned in this article.
Checking for adequate clearance over the spine
Next you need to check clearance at the back of the saddle. Place your right hand under the saddle from the rear, along the horse’s spine, and all the way so that your fingertips are under the cantle back. Now, with your left hand gently push down on the seat. There should be no pressure there at all. If there is any pressure here it needs to be corrected with a pad that has an additional channel for spine relief of the horse. We have a special tree spacer available in most models of our saddles for horses that have a protruding spine and are not protected by muscle. This spacer needs to be placed in the tree as the saddle is being built.
Checking for a level saddle
Tie your horse on level ground and take a few steps back to analyze the whole picture at this time. Is the saddle level? If it is rising in the back there are several causes and further work will be needed. Is your horse mutton withered? If your horse has a lower wither than most horses then there is inadequate wither to hold this tree level. In this case your horse will need a rear flank set (rear girth), V-Rigging or Center Fire Rigging, and/or breeching to prevent the saddle from slipping forward.
You can Center-Fire Rig any Crest Ridge saddle. click here to watch Debra's YouTube video to see how to center-fire rig your saddle.
Breast collars and cruppers help maintain a well fitting saddle in the proper position
Breast collars prevent the saddle from slipping to the rear. Attach your
breast collar making sure that it is as snug as a leather belt would be to hold your pants up. People that you see riding with a flopping breast collar have improperly attached the collar. The purpose of a breast collar is to hold that saddle exactly where you originally placed it and if it is “sloppy” in its fit, it is merely a decoration and provides no added security with regards to saddle placement.
The pictureon the right shows Crest Ridge's 4-point Terrain Collar. The same guidance for how tightly to snug the breast collar applies to the "Y" breast collars.
Cruppers prevent the saddle from slipping forward. Cruppers are mostcommonly beneficial for mutton withered horses and those that are built "going down hill" where the hip is higher than the shoulders. Most horses with a well developed wither do not need a crupper. The crupper goes under the horses tail and attaches to the back of the saddle. The crupper is tightened in the same manner as the breast collar. A loose crupper will not keep the saddle in place.
Customer Comment:
Debra, I'm slow at getting this email to you but I needed to say thank you for your call on reading Dunkun's white towel test. Let me start at the beginning: I contacted you by email with pictures and wither tracings just like you say on your website. We decided to get an Ovation in 17 wide for Dunkun and me. I was a little concerned over the pommel style for myself as well as the fenders so you sent me your personal saddle to test ride, since it was exactly what I was getting. Well, I put it on Dunkun and we did the saddle fit, just like your directions on the web. We tried 2 different pads and thought the second might be OK. I got in the saddle (which seemed pretty comfy for the few minutes I was in it) unfortunately I could tell Dunkun wasn't really happy so I let my hubby do the ride for the white towel test. I mean, your saddle was here it had to be tested. Oh, the white towel test was not what we'd hoped for. I sent you pictures of Dunkun with the saddle on and the white towel test .. you contacted me ASAP when you got them ... first you said ... he needs an extra wide tree ... next he needs standard rigging ... and then the most important thing of all ... he's out and needs a chiropactor. You could not emphasize enough how bad you thought his hips were out ... well, we canceled that order and ordered a different saddle but only after I promised to get Dunkun adjusted. Keeping good my promise, that same day I contacted a good friend, got the number of a certified equine chiropractor and had her here that very weekend. I was shocked at how badly Dunkun was out .. his withers, spine and hips were all out ... the poor boy even let out a faint cry as she adjusted his withers. You sure do know how to call it from a white towel test ... I just don't know how to thank you enough for saving my poor boy. Here I thought he was getting old and his shape was changing because of that ... you should see his top line now, wow. What a difference, and his hips are so level now I just never noticed they weren't before. It truly amazes me how you could see so much and from an email picture of a white towel test. I personally cannot thank you enough and you didn't even care if I bought a saddle from you, you only cared that Dunkun got helped. So, when my new saddle finally gets here I'm going to do the white towel test and anxiously await your input. One thing for sure, Dunkun's in good shape now and I know how to check him, plus I now have a great chiropractor to keep him fit. Thank you again, Chris Mackey